springboot如何多线程异步执行定时任务
在后台开发时,经常需要执行后台任务,相比使用quartz等复杂定时框架,使用springboot自带定时框架,能简单轻松满足大部分定时任务。
工具/原料
- 已经配置好springboot依赖
方法/步骤
- 创建一个后台定时任务的类,并标明@Component标注。创建一个普通方式,加上@Scheduled标注,例如:@Scheduled(cron = “0 27 10 * * ?”)

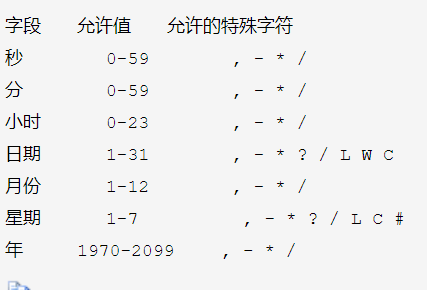
2.在Scheduled标注加上cron的定时标注。cron的6或7个字段从前到后对应的是: 秒 分钟 小时 日期 月份 星期 年例如:要每天10点27分执行 @Scheduled(cron = “0 27 10 * * ?”)每小时执行1次 @Scheduled(cron = “0 0 0/1 * * ?”)
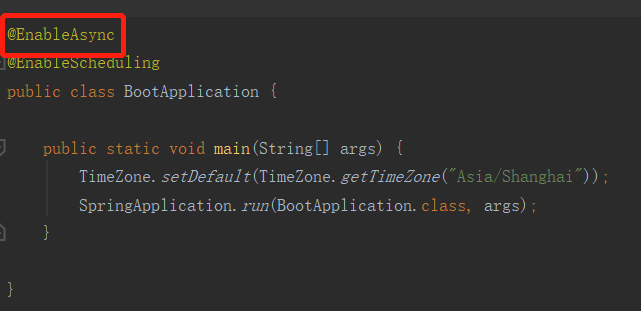
3.在启动类BootApplication添加@EnableScheduling标注,这时定时任务就可以执行了。完成了上面3步,如果有多个定时任务,这时是串行的,只有前面1个定时任务执行完,后面的定时任务才能执行。要异步执行,首先在在启动类BootApplication添加@EnableAsync标注
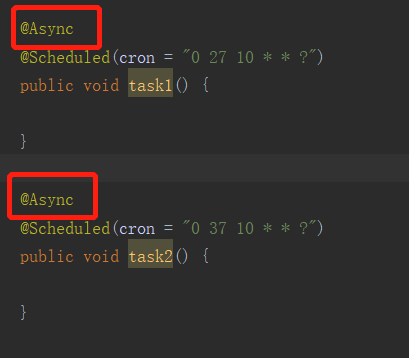
4.在定时任务执行方法上添加@Async标注
5.添加多线程配置类,设置线程池并发个数等。
@Configuration
@EnableAsync
public class SpringAsycConfigurer implements AsyncConfigurer {

    @Override
    public Executor getAsyncExecutor() {
        ThreadPoolTaskExecutor executor = new ThreadPoolTaskExecutor();
        executor.setCorePoolSize(12);
        executor.setMaxPoolSize(20);
        executor.setWaitForTasksToCompleteOnShutdown(true);
        executor.setAwaitTerminationSeconds( 60 * 15);
        executor.setThreadNamePrefix("MyAsync-");
        executor.initialize();
        return executor;
    }

    @Override
    public AsyncUncaughtExceptionHandler getAsyncUncaughtExceptionHandler() {
        return null;
    }
}
关注公众号“大模型全栈程序员”回复“小程序”获取1000个小程序打包源码。更多免费资源在http://www.gitweixin.com/?p=2627