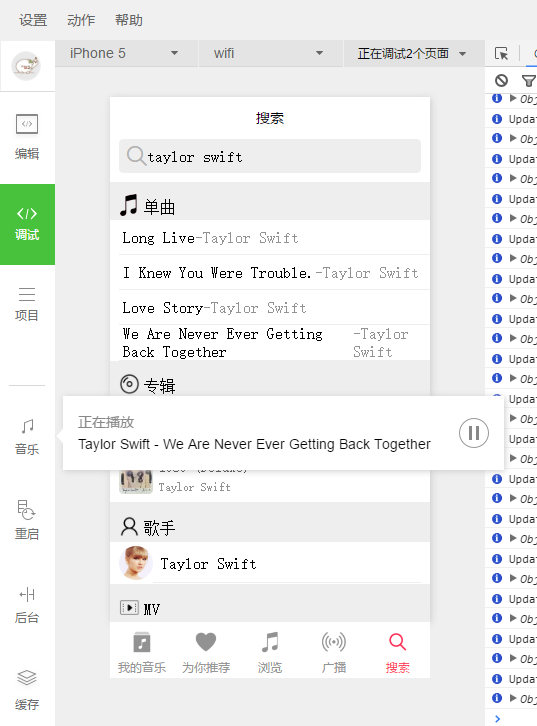
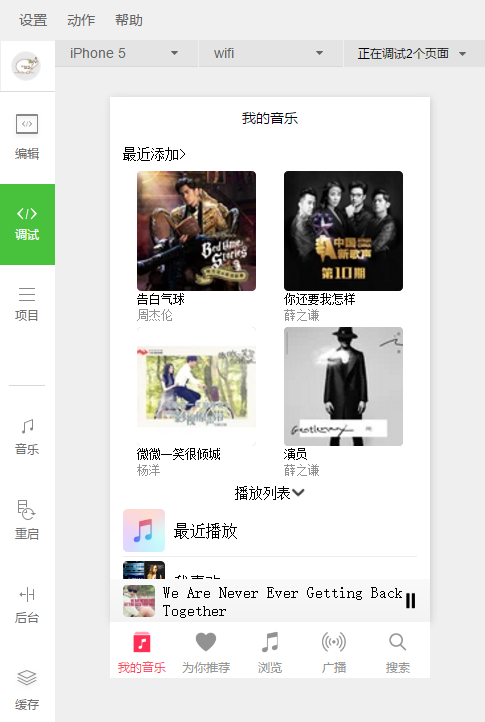
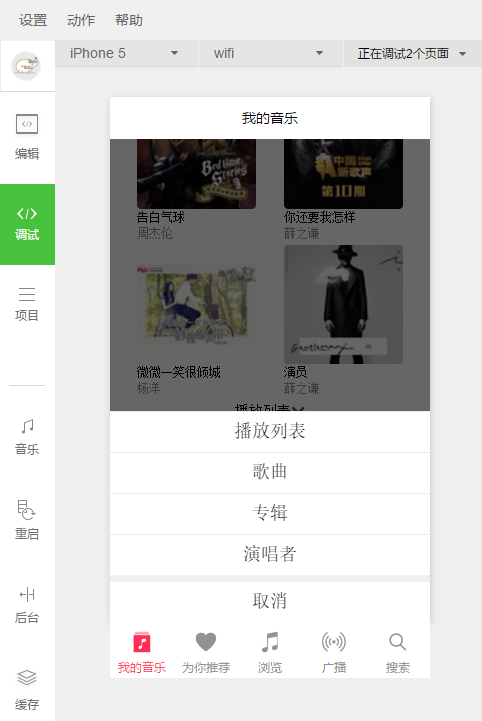
gitweixin
  • 首页
  • 小程序代码
    • 资讯读书
    • 工具类
    • O2O
    • 地图定位
    • 社交
    • 行业软件
    • 电商类
    • 互联网类
    • 企业类
    • UI控件
  • 大数据开发
    • Hadoop
    • Spark
    • Hbase
    • Elasticsearch
    • Kafka
    • Flink
    • 数据仓库
    • 数据挖掘
    • flume
    • Kafka
    • Hive
    • shardingsphere
    • solr
  • 开发博客
    • Android
    • php
    • python
    • 运维
    • 技术架构
    • 数据库
  • 程序员网赚
  • bug清单
  • 量化投资
  • 在线查询工具
    • 去行号
    • 在线时间戳转换工具
    • 免费图片批量修改尺寸在线工具
    • SVG转JPG在线工具

Flink 配置表与流JOIN程序

精品微信小程序开发门户,代码全部亲测可用

  • 首页   /  
  • 作者: east
  • ( 页面61 )
Flink 3月 1,2021

Flink 配置表与流JOIN程序

场景说明

场景说明

假定用户有某个网站周末网民网购停留时间的日志文本,另有一张网民个人信息的csv格式表,基于某些业务要求,要求开发Flink的应用程序实现如下功能:

  • 实时统计总计网购时间超过2个小时的女性网民信息,包含对应的个人详细信息; 其中日志文本和csv格式表中的姓名字段可作为关键字,通过该值将两张表联合起来。
  • 周末两天的日志文件第一列为姓名,第二列为性别,第三列为本次停留时间,单位为分钟,分隔符为“,”。 data.txt:周末两天网民停留日志


LiuYang,female,20 YuanJing,male,10 GuoYijun,male,5 CaiXuyu,female,50 Liyuan,male,20 FangBo,female,50 LiuYang,female,20 YuanJing,male,10 GuoYijun,male,50 CaiXuyu,female,50 FangBo,female,60 LiuYang,female,20 YuanJing,male,10 CaiXuyu,female,50 FangBo,female,50 GuoYijun,male,5 CaiXuyu,female,50 Liyuan,male,20 CaiXuyu,female,50 FangBo,female,50 LiuYang,female,20 YuanJing,male,10 FangBo,female,50 GuoYijun,male,50 CaiXuyu,female,50 FangBo,female,60 NotExist,female,200

  • configtable.csv:网民个人信息,第一列为姓名,第二列为年龄,第三列为公司,第四列为工作地点,第五列为学历,第六列为工作年数,第七列为手机号码,第八列为户籍所在地,第九列为毕业学校,csv标准格式,即分隔符为“,”


username,age,company,workLocation,educational,workYear,phone,nativeLocation,school LiuYang,25,Microsoft,hangzhou,college,5,13512345678,hangzhou zhejiang,wuhan university YuanJing,26,Oracle,shanghai,master,6,13512345679,shijiazhuang hebei,zhejiang university GuoYijun,27,Alibaba,beijing,college,7,13512345680,suzhou jiangsu,qinghua university CaiXuyu,28,Coca Cola,shenzheng,master,8,13512345681,hefei anhui,beijing university Liyuan,29,Tencent,chengdou,doctor,9,13512345682,nanchang jiangxi,nanjing university FangBo,30,Huawei,qingdao,doctor,10,13512345683,xiamen fujian,fudan university

开发思路

统计日志文件中本周末网购停留总时间超过2个小时的女性网民信息,包含对应的个人详细信息。

主要分为七个部分:

  • 修改“import.properties”和“read.properties”配置,配置csv文件字段、Redis读取字段以及Redis的节点信息配置
  • 导入“configtable.csv”配置表进入Redis中存储起来。
  • 读取文本数据,生成相应DataStream,解析数据生成OriginalRecord信息。
  • 调用异步IO的函数,以OriginalRecord用户姓名字段为关键字在Redis中查询对应的个人信息,并转化为UserRecord。
  • 筛选出女性网民上网时间数据信息。
  • 按照姓名进行keyby操作,并汇总在一个时间窗口内每个女性上网时间。
  • 筛选连续上网时间超过阈值的用户,并获取结果。
package com.huawei.bigdata.flink.examples;

import org.apache.flink.api.java.utils.ParameterTool;

import org.supercsv.cellprocessor.constraint.NotNull;
import org.supercsv.cellprocessor.ift.CellProcessor;
import org.supercsv.io.CsvBeanReader;
import org.supercsv.io.ICsvBeanReader;
import org.supercsv.prefs.CsvPreference;
import redis.clients.jedis.HostAndPort;
import redis.clients.jedis.JedisCluster;

import java.io.File;
import java.io.FileReader;
import java.util.*;

/**
 * Read data from csv file and import to redis.
 */
public class RedisDataImport {
    public static void main(String[] args) throws Exception {
        // print comment for command to use run flink
        System.out.println("use command as: \n" +
                "java -cp /opt/FI-Client/Flink/flink/lib/*:/opt/FlinkConfigtableJavaExample.jar" +
                " com.huawei.bigdata.flink.examples.RedisDataImport --configPath <config filePath>" +
                "******************************************************************************************\n" +
                "<config filePath> is for configure file to load\n" +
                "you may write following content into config filePath: \n" +
                "CsvPath=config/configtable.csv\n" +
                "CsvHeaderExist=true\n" +
                "ColumnNames=username,age,company,workLocation,educational,workYear,phone,nativeLocation,school\n" +
                "Redis_IP_Port=SZV1000064084:22400,SZV1000064082:22400,SZV1000064085:22400\n" +
                "******************************************************************************************");

        // read all configures
        final String configureFilePath = ParameterTool.fromArgs(args).get("configPath", "config/import.properties");
        final String csvFilePath = ParameterTool.fromPropertiesFile(configureFilePath).get("CsvPath", "config/configtable.csv");
        final boolean isHasHeaders = ParameterTool.fromPropertiesFile(configureFilePath).getBoolean("CsvHeaderExist", true);
        final String csvScheme = ParameterTool.fromPropertiesFile(configureFilePath).get("ColumnNames");
        final String redisIPPort = ParameterTool.fromPropertiesFile(configureFilePath).get("Redis_IP_Port");

        // init redis client
        Set<HostAndPort> hosts = new HashSet<HostAndPort>();
        for (String hostAndPort : redisIPPort.split(",")) {
            hosts.add(new HostAndPort(hostAndPort.split(":")[0], Integer.parseInt(hostAndPort.split(":")[1])));
        }
        final JedisCluster client = new JedisCluster(hosts, 15000);

        // get all files under csv file path
        ArrayList<File> files = getListFiles(csvFilePath);
        System.out.println("Read file or directory under  " + csvFilePath
                + ", total file num: " + files.size() + ", columns: " + csvScheme);

        // run read csv file and analyze it
        for (int index = 0; index < files.size(); index++) {
            readWithCsvBeanReader(files.get(index).getAbsolutePath(), csvScheme, isHasHeaders, client);
        }
        client.close();
        System.out.println("Data import finish!!!");
    }

    public static ArrayList<File> getListFiles(Object obj) {
        File directory = null;
        if (obj instanceof File) {
            directory = (File) obj;
        } else {
            directory = new File(obj.toString());
        }
        ArrayList<File> files = new ArrayList<File>();
        if (directory.isFile()) {
            files.add(directory);
            return files;
        } else if (directory.isDirectory()) {
            File[] fileArr = directory.listFiles();
            for (int i = 0; i < fileArr.length; i++) {
                File fileOne = fileArr[i];
                files.addAll(getListFiles(fileOne));
            }
        }
        return files;
    }

    /**
     * Sets up the processors used for read csv. There are 9 CSV columns. Empty
     * columns are read as null (hence the NotNull() for mandatory columns).
     *
     * @return the cell processors
     */
    private static CellProcessor[] getProcessors() {
        final CellProcessor[] processors = new CellProcessor[] {
                new NotNull(), // username
                new NotNull(), // age
                new NotNull(), // company
                new NotNull(), // workLocation
                new NotNull(), // educational
                new NotNull(), // workYear
                new NotNull(), // phone
                new NotNull(), // nativeLocation
                new NotNull(), // school
        };

        return processors;
    }

    private static void readWithCsvBeanReader(String path, String csvScheme, boolean isSkipHeader, JedisCluster client) throws Exception {
        ICsvBeanReader beanReader = null;
        try {
            beanReader = new CsvBeanReader(new FileReader(path), CsvPreference.STANDARD_PREFERENCE);

            // the header elements are used to map the values to the bean (names must match)
            final String[] header = isSkipHeader ? beanReader.getHeader(true) : csvScheme.split(",");
            final CellProcessor[] processors = getProcessors();

            UserInfo userinfo;
            while( (userinfo = beanReader.read(UserInfo.class, header, processors)) != null ) {
                System.out.println(String.format("lineNo=%s, rowNo=%s, userinfo=%s", beanReader.getLineNumber(),
                        beanReader.getRowNumber(), userinfo));

                // set redis key and value
                client.hmset(userinfo.getKeyValue(), userinfo.getMapInfo());
            }
        }
        finally {
            if( beanReader != null ) {
                beanReader.close();
            }
        }
    }


    // define the UserInfo structure
    public static class UserInfo {
        private String username;
        private String age;
        private String company;
        private String workLocation;
        private String educational;
        private String workYear;
        private String phone;
        private String nativeLocation;
        private String school;


        public UserInfo() {

        }

        public UserInfo(String nm, String a, String c, String w, String e, String wy, String p, String nl, String sc) {
            username = nm;
            age = a;
            company = c;
            workLocation = w;
            educational = e;
            workYear = wy;
            phone = p;
            nativeLocation = nl;
            school = sc;
        }

        public String toString() {
            return "UserInfo-----[username: " + username + "  age: " + age + "  company: " + company
                    + "  workLocation: " + workLocation + "  educational: " + educational
                    + "  workYear: " + workYear + "  phone: " + phone + "  nativeLocation: " + nativeLocation + "  school: " + school + "]";
        }

        // get key
        public String getKeyValue() {
            return username;
        }

        public Map<String, String> getMapInfo() {
            Map<String, String> info = new HashMap<String, String>();
            info.put("username", username);
            info.put("age", age);
            info.put("company", company);
            info.put("workLocation", workLocation);
            info.put("educational", educational);
            info.put("workYear", workYear);
            info.put("phone", phone);
            info.put("nativeLocation", nativeLocation);
            info.put("school", school);
            return info;
        }

        /**
         * @return the username
         */
        public String getUsername() {
            return username;
        }

        /**
         * @param username
         *            the username to set
         */
        public void setUsername(String username) {
            this.username = username;
        }

        /**
         * @return the age
         */
        public String getAge() {
            return age;
        }

        /**
         * @param age
         *            the age to set
         */
        public void setAge(String age) {
            this.age = age;
        }

        /**
         * @return the company
         */
        public String getCompany() {
            return company;
        }

        /**
         * @param company
         *            the company to set
         */
        public void setCompany(String company) {
            this.company = company;
        }

        /**
         * @return the workLocation
         */
        public String getWorkLocation() {
            return workLocation;
        }

        /**
         * @param workLocation
         *            the workLocation to set
         */
        public void setWorkLocation(String workLocation) {
            this.workLocation = workLocation;
        }

        /**
         * @return the educational
         */
        public String getEducational() {
            return educational;
        }

        /**
         * @param educational
         *            the educational to set
         */
        public void setEducational(String educational) {
            this.educational = educational;
        }

        /**
         * @return the workYear
         */
        public String getWorkYear() {
            return workYear;
        }

        /**
         * @param workYear
         *            the workYear to set
         */
        public void setWorkYear(String workYear) {
            this.workYear = workYear;
        }

        /**
         * @return the phone
         */
        public String getPhone() {
            return phone;
        }

        /**
         * @param phone
         *            the phone to set
         */
        public void setPhone(String phone) {
            this.phone = phone;
        }

        /**
         * @return the nativeLocation
         */
        public String getNativeLocation() {
            return nativeLocation;
        }

        /**
         * @param nativeLocation
         *            the nativeLocation to set
         */
        public void setNativeLocation(String nativeLocation) {
            this.nativeLocation = nativeLocation;
        }

        /**
         * @return the school
         */
        public String getSchool() {
            return school;
        }

        /**
         * @param school
         *            the school to set
         */
        public void setSchool(String school) {
            this.school = school;
        }
    }
}
package com.huawei.bigdata.flink.examples;

import org.apache.flink.api.common.functions.FilterFunction;
import org.apache.flink.api.common.functions.MapFunction;
import org.apache.flink.api.common.functions.ReduceFunction;
import org.apache.flink.api.java.functions.KeySelector;
import org.apache.flink.api.java.utils.ParameterTool;
import org.apache.flink.configuration.Configuration;
import org.apache.flink.shaded.com.google.common.cache.CacheBuilder;
import org.apache.flink.shaded.com.google.common.cache.CacheLoader;
import org.apache.flink.shaded.com.google.common.cache.LoadingCache;
import org.apache.flink.streaming.api.datastream.AsyncDataStream;
import org.apache.flink.streaming.api.datastream.DataStream;
import org.apache.flink.streaming.api.environment.StreamExecutionEnvironment;
import org.apache.flink.streaming.api.TimeCharacteristic;
import org.apache.flink.streaming.api.functions.AssignerWithPunctuatedWatermarks;
import org.apache.flink.streaming.api.functions.async.AsyncFunction;
import org.apache.flink.streaming.api.functions.async.RichAsyncFunction;
import org.apache.flink.streaming.api.functions.async.collector.AsyncCollector;
import org.apache.flink.streaming.api.watermark.Watermark;
import org.apache.flink.streaming.api.windowing.assigners.TumblingEventTimeWindows;
import org.apache.flink.streaming.api.windowing.time.Time;
import redis.clients.jedis.HostAndPort;
import redis.clients.jedis.JedisCluster;

import java.util.*;
import java.util.concurrent.TimeUnit;
/**
 * Read stream data and join from configure table from redis.
 */
public class FlinkConfigtableJavaExample {

    public static void main(String[] args) throws Exception {
        // print comment for command to use run flink
        System.out.println("use command as: \n" +
                "./bin/flink run --class com.huawei.bigdata.flink.examples.FlinkConfigtableJavaExample" +
                " -m yarn-cluster -yt /opt/config -yn 3 -yjm 1024 -ytm 1024 " +
                "/opt/FlinkConfigtableJavaExample.jar --dataPath config/data.txt" +
                "******************************************************************************************\n" +
                "Especially you may write following content into config filePath, as in config/read.properties: \n" +
                "ReadFields=username,age,company,workLocation,educational,workYear,phone,nativeLocation,school\n" +
                "Redis_IP_Port=SZV1000064084:22400,SZV1000064082:22400,SZV1000064085:22400\n" +
                "******************************************************************************************");

        // set up the execution environment
        final StreamExecutionEnvironment env = StreamExecutionEnvironment.getExecutionEnvironment();
        env.setStreamTimeCharacteristic(TimeCharacteristic.EventTime);
        env.setParallelism(1);

        // get configure and read data and transform to OriginalRecord
        final String dataPath = ParameterTool.fromArgs(args).get("dataPath", "config/data.txt");
        DataStream<OriginalRecord> originalStream = env.readTextFile(
                dataPath
        ).map(new MapFunction<String, OriginalRecord>() {
            @Override
            public OriginalRecord map(String value) throws Exception {
                return getRecord(value);
            }
        }).assignTimestampsAndWatermarks(
                new Record2TimestampExtractor()
        ).disableChaining();

        // read from redis and join to the whole user information
        AsyncFunction<OriginalRecord, UserRecord> function = new AsyncRedisRequest();
        // timeout set to 2 minutes, max parallel request num set to 5, you can modify this to optimize
        DataStream<UserRecord> result = AsyncDataStream.unorderedWait(
                originalStream,
                function,
                2,
                TimeUnit.MINUTES,
                5);

        // data transform
        result.filter(new FilterFunction<UserRecord>() {
            @Override
            public boolean filter(UserRecord value) throws Exception {
                return value.sexy.equals("female");
            }
        }).keyBy(
                new UserRecordSelector()
        ).window(
                TumblingEventTimeWindows.of(Time.seconds(30))
        ).reduce(new ReduceFunction<UserRecord>() {
            @Override
            public UserRecord reduce(UserRecord value1, UserRecord value2)
                    throws Exception {
                value1.shoppingTime += value2.shoppingTime;
                return value1;
            }
        }).filter(new FilterFunction<UserRecord>() {
            @Override
            public boolean filter(UserRecord value) throws Exception {
                return value.shoppingTime > 120;
            }
        }).print();

        // execute program
        env.execute("FlinkConfigtable java");
    }

    private static class UserRecordSelector implements KeySelector<UserRecord, String> {
        @Override
        public String getKey(UserRecord value) throws Exception {
            return value.name;
        }
    }

    // class to set watermark and timestamp
    private static class Record2TimestampExtractor implements AssignerWithPunctuatedWatermarks<OriginalRecord> {

        // add tag in the data of datastream elements
        @Override
        public long extractTimestamp(OriginalRecord element, long previousTimestamp) {
            return System.currentTimeMillis();
        }

        // give the watermark to trigger the window to execute, and use the value to check if the window elements is ready
        @Override
        public Watermark checkAndGetNextWatermark(OriginalRecord element, long extractedTimestamp) {
            return new Watermark(extractedTimestamp - 1);
        }
    }

    private static OriginalRecord getRecord(String line) {
        String[] elems = line.split(",");
        assert elems.length == 3;
        return new OriginalRecord(elems[0], elems[1], Integer.parseInt(elems[2]));
    }

    public static class OriginalRecord {
        private String name;
        private String sexy;
        private int shoppingTime;

        public OriginalRecord(String n, String s, int t) {
            name = n;
            sexy = s;
            shoppingTime = t;
        }
    }

    public static class UserRecord {
        private String name;
        private int age;
        private String company;
        private String workLocation;
        private String educational;
        private int workYear;
        private String phone;
        private String nativeLocation;
        private String school;
        private String sexy;
        private int shoppingTime;

        public UserRecord(String nm, int a, String c, String w, String e, int wy, String p, String nl, String sc, String sx, int st) {
            name = nm;
            age = a;
            company = c;
            workLocation = w;
            educational = e;
            workYear = wy;
            phone = p;
            nativeLocation = nl;
            school = sc;
            sexy = sx;
            shoppingTime = st;
        }

        public void setInput(String input_nm, String input_sx, int input_st) {
            name = input_nm;
            sexy = input_sx;
            shoppingTime = input_st;
        }

        public String toString() {
            return "UserRecord-----name: " + name + "  age: " + age + "  company: " + company
                    + "  workLocation: " + workLocation + "  educational: " + educational
                    + "  workYear: " + workYear + "  phone: " + phone + "  nativeLocation: " + nativeLocation + "  school: " + school
                    + "  sexy: " + sexy + "  shoppingTime: " + shoppingTime;
        }
    }

    public static class AsyncRedisRequest extends RichAsyncFunction<OriginalRecord, UserRecord>{
        private String fields = "";
        private transient JedisCluster client;
        private LoadingCache<String, UserRecord> cacheRecords;

        @Override
        public void open(Configuration parameters) throws Exception {
            super.open(parameters);

            // init cache builder
            cacheRecords = CacheBuilder.newBuilder()
                    .maximumSize(10000)
                    .expireAfterAccess(7, TimeUnit.DAYS)
                    .build(new CacheLoader<String, UserRecord>() {
                        public UserRecord load(String key) throws Exception {
                            //load from redis
                            return loadFromRedis(key);
                        }
                    });

            // get configure from config/read.properties, you must put this with commands:
            // ./bin/yarn-session.sh -t config -n 3 -jm 1024 -tm 1024 or
            // ./bin/flink run -m yarn-cluster -yt config -yn 3 -yjm 1024 -ytm 1024 /opt/test.jar
            String configPath = "config/read.properties";
            fields = ParameterTool.fromPropertiesFile(configPath).get("ReadFields");
            final String hostPort = ParameterTool.fromPropertiesFile(configPath).get("Redis_IP_Port");
            // create jedisCluster client
            Set<HostAndPort> hosts = new HashSet<HostAndPort>();
            for (String node : hostPort.split(",")) {
                hosts.add(new HostAndPort(node.split(":")[0], Integer.parseInt(node.split(":")[1])));
            }
            client = new JedisCluster(hosts, 60000);
            System.out.println("JedisCluster init, getClusterNodes: " + client.getClusterNodes().size());
        }

        @Override
        public void close() throws Exception {
            super.close();

            if (client != null) {
                System.out.println("JedisCluster close!!!");
                client.close();
            }
        }

        public UserRecord loadFromRedis(final String key) throws Exception {
            if (client.getClusterNodes().size() <= 0) {
                System.out.println("JedisCluster init failed, getClusterNodes: " + client.getClusterNodes().size());
            }
            if (!client.exists(key)) {
                System.out.println("test-------cannot find data to key:  " + key);
                return new UserRecord(
                        "null",
                        0,
                        "null",
                        "null",
                        "null",
                        0,
                        "null",
                        "null",
                        "null",
                        "null",
                        0);
            } else {
                // get some fields
                List<String> values = client.hmget(key, fields.split(","));
                System.out.println("test-------key: " + key + "  get some fields:  " + values.toString());
                return new UserRecord(
                        values.get(0),
                        Integer.parseInt(values.get(1)),
                        values.get(2),
                        values.get(3),
                        values.get(4),
                        Integer.parseInt(values.get(5)),
                        values.get(6),
                        values.get(7),
                        values.get(8),
                        "null",
                        0);
            }
        }

        public void asyncInvoke(final OriginalRecord input, final AsyncCollector<UserRecord> collector) throws Exception {
            // set key string, if you key is more than one column, build your key string with columns
            String key = input.name;
            UserRecord info = cacheRecords.get(key);
            info.setInput(input.name, input.sexy, input.shoppingTime);
            collector.collect(Collections.singletonList(info));
        }
    }
}
作者 east
Flink 3月 1,2021

Flink Job Pipeline程序

场景说明

场景说明

本样例中发布者Job自己每秒钟产生10000条数据,然后经由该job的NettySink算子向下游发送。另外两个Job作为订阅者,分别订阅一份数据。

数据规划

  1. 发布者Job使用自定义算子每秒钟产生10000条数据
  2. 数据包含两个属性:分别是Int和String类型
  3. 配置文件
    • nettyconnector.registerserver.topic.storage:设置NettySink的IP、端口及并发度信息在第三方注册服务器上的路径(必填),例如:nettyconnector.registerserver.topic.storage: /flink/nettyconnector
    • nettyconnector.sinkserver.port.range:设置NettySink的端口范围(必填),例如:nettyconnector.sinkserver.port.range: 28444-28943
    • nettyconnector.sinkserver.subnet:设置网络所属域,例如:nettyconnector.sinkserver.subnet: 10.162.0.0/16
  4. 接口说明
    • 注册服务器接口 注册服务器用来保存NettySink的IP、端口以及并发度信息,以便NettySource连接使用。为用户提供以下接口:public interface RegisterServerHandler { /** * 启动注册服务器 * @param configuration Flink的Configuration类型 */ void start(Configuration configuration) throws Exception; /** *注册服务器上创建Topic节点(目录) * @param topic topic节点名称 */ void createTopicNode(String topic) throw Exception; /** *将信息注册到某个topic节点(目录)下 * @param topic 需要注册到的目录 * @param registerRecord 需要注册的信息 */ void register(String topic, RegisterRecord registerRecord) throws Exception; /** *删除topic节点 * @param topic 待删除topic */ void deleteTopicNode(String topic) throws Exception; /** *注销注册信息 *@param topic 注册信息所在的topic *@param recordId 待注销注册信息ID */ void unregister(String topic, int recordId) throws Exception; /** * 查寻信息 * @param 查询信息所在的topic *@recordId 查询信息的ID */ RegisterRecord query(String topic, int recordId) throws Exception; /** * 查询某个Topic是否存在 * @param topic */ Boolean isExist(String topic) throws Exception; /** *关闭注册服务器句柄 */ void shutdown() throws Exception; 工程基于以上接口提供了ZookeeperRegisterHandler供用户使用。
    • NettySink算子Class NettySink(String name, String topic, RegisterServerHandler registerServerHandler, int numberOfSubscribedJobs)
      • name:为本NettySink的名称。
      • topic:为本NettySink产生数据的Topic,每个不同的NettySink(并发度除外)必须使用不同的TOPIC,否则会引起订阅混乱,数据无法正常分发。
      • registerServerHandler: 为注册服务器的句柄。
      • numberOfSubscribedJobs:为订阅本NettySink的作业数量,该数量必须是明确的,只有当所有订阅者都连接上NettySink,NettySink才发送数据。
    • NettySource算子Class NettySource(String name, String topic, RegisterServerHandler registerServerHandler)
      • name:为本NettySource的名称,该NettySource必须是唯一的(并发度除外),否则,连接NettySink时会出现冲突,导致无法连接。
      • topic:订阅的NettySink的topic。
      • registerServerHandler:为注册服务器的句柄。

说明:

NettySource的并发度必须与NettySource的并发度相同,否则无法正常创建连接。

开发思路

1. 一个Job作为发布者Job,其余两个作为订阅者Job

2. 发布者Job自己产生数据将其转化成byte[],分别向订阅者发送

3. 订阅者收到byte[]之后将其转化成String类型,并抽样打印输出

Java版代码:

  1. 发布Job自定义Source算子产生数据
package com.huawei.bigdata.flink.examples;
 
import org.apache.flink.api.java.tuple.Tuple2;
import org.apache.flink.configuration.Configuration;
import org.apache.flink.streaming.api.functions.source.RichParallelSourceFunction;
 
import java.io.Serializable;
 
public class UserSource extends RichParallelSourceFunction<Tuple2<Integer, String>> implements Serializable {
 
    private boolean isRunning = true;
 
    public void open(Configuration configuration) throws Exception {
        super.open(configuration);
 
    }
/**
    * 数据产生函数,每秒钟产生10000条数据
   */
    public void run(SourceContext<Tuple2<Integer, String>> ctx) throws Exception {
 
        while(isRunning) {
            for (int i = 0; i < 10000; i++) {
                ctx.collect(Tuple2.of(i, "hello-" + i));
            }
            Thread.sleep(1000);
        }
    }
 
    public void close() {
        isRunning = false;
    }
 
    public void cancel() {
        isRunning = false;
    }
}
  1. 发布者代码
package com.huawei.bigdata.flink.examples;
 
import org.apache.flink.api.common.functions.MapFunction;
import org.apache.flink.api.java.tuple.Tuple2;
import org.apache.flink.streaming.api.environment.StreamExecutionEnvironment;
import org.apache.flink.streaming.connectors.netty.sink.NettySink;
import org.apache.flink.streaming.connectors.netty.utils.ZookeeperRegisterServerHandler;
 
public class TestPipeline_NettySink {
 
    public static void main(String[] args) throws Exception{
 
        StreamExecutionEnvironment env = StreamExecutionEnvironment.getExecutionEnvironment();
//设置job的并发度为2
        env.setBufferTimeout(2);
 
// 创建Zookeeper的注册服务器handler
        ZookeeperRegisterServerHandler zkRegisterServerHandler = new ZookeeperRegisterServerHandler();
// 添加自定义Source算子
        env.addSource(new UserSource())
                .keyBy(0)
                .map(new MapFunction<Tuple2<Integer,String>, byte[]>() {
                    //将发送信息转化成字节数组
@Override
                    public byte[] map(Tuple2<Integer, String> integerStringTuple2) throws Exception {
                        return integerStringTuple2.f1.getBytes();
                    }
                }).addSink(new NettySink("NettySink-1", "TOPIC-2", zkRegisterServerHandler, 2));//通过NettySink发送出去。
 
        env.execute();
 
    }
}
  1. 第一个订阅者
package com.huawei.bigdata.flink.examples;
 
import org.apache.flink.api.common.functions.MapFunction;
import org.apache.flink.streaming.api.environment.StreamExecutionEnvironment;
import org.apache.flink.streaming.connectors.netty.source.NettySource;
import org.apache.flink.streaming.connectors.netty.utils.ZookeeperRegisterServerHandler;
 
public class TestPipeline_NettySource1 {
 
    public static void main(String[] args) throws Exception{
 
        StreamExecutionEnvironment env = StreamExecutionEnvironment.getExecutionEnvironment();
// 设置job的并发度为2        
env.setParallelism(2);
 
// 创建Zookeeper的注册服务器句柄
        ZookeeperRegisterServerHandler zkRegisterServerHandler = new ZookeeperRegisterServerHandler();
//添加NettySource算子,接收来自发布者的消息
        env.addSource(new NettySource("NettySource-1", "TOPIC-2", zkRegisterServerHandler))
                .map(new MapFunction<byte[], String>() {
                  // 将接收到的字节流转化成字符串  
    @Override
                    public String map(byte[] b) {
                        return new String(b);
                    }
                }).print();
 
        env.execute();
    }
}
  1. 第二个订阅者
package com.huawei.bigdata.flink.examples;
 
import org.apache.flink.api.common.functions.MapFunction;
import org.apache.flink.streaming.api.environment.StreamExecutionEnvironment;
import org.apache.flink.streaming.connectors.netty.source.NettySource;
import org.apache.flink.streaming.connectors.netty.utils.ZookeeperRegisterServerHandler;
 
public class TestPipeline_NettySource2 {
 
    public static void main(String[] args) throws Exception {
 
        StreamExecutionEnvironment env = StreamExecutionEnvironment.getExecutionEnvironment();
// 设置作业的并发度为2       
 env.setParallelism(2);
 
//创建Zookeeper的注册服务器句柄
        ZookeeperRegisterServerHandler zkRegisterServerHandler = new ZookeeperRegisterServerHandler();
//添加NettySource算子,接收来自发布者的数据
        env.addSource(new NettySource("NettySource-2", "TOPIC-2", zkRegisterServerHandler))
                .map(new MapFunction<byte[], String>() {
          //将接收到的字节数组转化成字符串
                    @Override
                    public String map(byte[] b) {
                        return new String(b);
                    }
                }).print();
 
        env.execute();
    }
}

Scala样例代码

  1. 发送消息
package com.huawei.bigdata.flink.examples
 
case class Inforamtion(index: Int, content: String) {
 
  def this() = this(0, "")
}
  1. 发布者job自定义source算子产生数据
package com.huawei.bigdata.flink.examples
 
import org.apache.flink.configuration.Configuration
import org.apache.flink.streaming.api.functions.source.RichParallelSourceFunction
import org.apache.flink.streaming.api.functions.source.SourceFunction.SourceContext
 
class UserSource extends RichParallelSourceFunction[Inforamtion] with Serializable{
 
  var isRunning = true
 
  override def open(parameters: Configuration): Unit = {
    super.open(parameters)
   
  }
 
// 每秒钟产生10000条数据
  override def run(sourceContext: SourceContext[Inforamtion]) = {
 
    while (isRunning) {
      for (i <- 0 until 10000) {
        sourceContext.collect(Inforamtion(i, "hello-" + i));
 
      }
      Thread.sleep(1000)
    }
  }
 
  override def close(): Unit = super.close()
 
  override def cancel() = {
    isRunning = false
  }
}
  1. 发布者代码
package com.huawei.bigdata.flink.examples
 
import org.apache.flink.streaming.api.scala.StreamExecutionEnvironment
import org.apache.flink.streaming.connectors.netty.sink.NettySink
import org.apache.flink.streaming.connectors.netty.utils.ZookeeperRegisterServerHandler
import org.apache.flink.streaming.api.scala._
 
object TestPipeline_NettySink {
 
  def main(args: Array[String]): Unit = {
 
    val env = StreamExecutionEnvironment.getExecutionEnvironment
// 设置job的并发度为2    
env.setParallelism(2)
//设置Zookeeper为注册服务器
    val zkRegisterServerHandler = new ZookeeperRegisterServerHandler
//添加用户自定义算子产生数据    
env.addSource(new UserSource)
      .keyBy(0).map(x=>x.content.getBytes)//将发送数据转化成字节数组
      .addSink(new NettySink("NettySink-1", "TOPIC-2", zkRegisterServerHandler, 2))//添加NettySink算子发送数据
 
    env.execute()
  }
}
  1. 第一个订阅者
package com.huawei.bigdata.flink.examples
 
import org.apache.flink.streaming.api.scala.StreamExecutionEnvironment
import org.apache.flink.streaming.connectors.netty.source.NettySource
import org.apache.flink.streaming.connectors.netty.utils.ZookeeperRegisterServerHandler
import org.apache.flink.streaming.api.scala._
 
import scala.util.Random
 
 
object TestPipeline_NettySource1 {
 
  def main(args: Array[String]): Unit = {
 
    val env = StreamExecutionEnvironment.getExecutionEnvironment
// 设置Job的并发度为2  
  env.setParallelism(2)
//设置Zookeeper作为注册服务器
val zkRegisterServerHandler = new ZookeeperRegisterServerHandler
//添加NettySource算子,接收来自发布者的数据
    env.addSource(new NettySource("NettySource-1", "TOPIC-2", zkRegisterServerHandler))
      .map(x => (1, new String(x)))//将接收到的字节流转化成字符串
      .filter(x => {
        Random.nextInt(50000) == 10
      })
      .print
 
    env.execute()
  }
}
  1. 第二个订阅者
package com.huawei.bigdata.flink.examples
 
import org.apache.flink.streaming.api.scala.StreamExecutionEnvironment
import org.apache.flink.streaming.connectors.netty.source.NettySource
import org.apache.flink.streaming.connectors.netty.utils.ZookeeperRegisterServerHandler
import org.apache.flink.streaming.api.scala._
 
import scala.util.Random
 
 
object TestPipeline_NettySource2 {
 
  def main(args: Array[String]): Unit = {
 
    val env = StreamExecutionEnvironment.getExecutionEnvironment
//设置job的并发度为2   
 env.setParallelism(2)
//创建Zookeeper作为注册服务器
    val zkRegisterServerHandler = new ZookeeperRegisterServerHandler
//添加NettySource算子,接收数据    
env.addSource(new NettySource("NettySource-2", "TOPIC-2", zkRegisterServerHandler))
      .map(x=>(2, new String(x)))//将接收到的字节数组转化成字符串
      .filter(x=>{
        Random.nextInt(50000) == 10
      })
      .print()
 
    env.execute()
  }
}
作者 east
Flink 3月 1,2021

Flink异步Checkpoint机制程序

场景说明

假定用户需要每隔1秒钟需要统计4秒中窗口中数据的量,并做到状态严格一致性,即:当应用出现异常并恢复后,各个算子的状态能够处于统一的状态。

数据规划

  1. 使用自定义算子每秒钟产生大约10000条数据。
  2. 产生的数据为一个四元组(Long,String,String,Integer)。
  3. 数据经统计后,统计结果打印到终端输出。
  4. 打印输出的结果为Long类型的数据。

开发思路

  1. source算子每隔1秒钟发送10000条数据,并注入到Window算子中。
  2. window算子每隔1秒钟统计一次最近4秒钟内数据数量。
  3. 每隔1秒钟将统计结果打印到终端。具体查看方式请参考查看调测结果。
  4. 每隔6秒钟触发一次checkpoint,然后将checkpoint的结果保存到HDFS中。

Java样例代码

功能介绍

假定用户需要每隔1秒钟需要统计4秒中窗口中数据的量,并做到状态严格一致性。

代码样例

  1. 快照数据 该数据在算子制作快照时用于保存到目前为止算子记录的数据条数。import java.io.Seriablizale; // 该类作为快照的一部分,保存用户自定义状态 public class UDFState implements Serializable { private long count; // 初始化用户自定义状态 public UDFState() { count = 0L; } // 设置用户自定义状态 public void setState(long count) { this.count = count; } // 获取用户自定义状态 public long geState() { return this.count; } }
  2. 带checkpoint的数据源 source算子的代码,该段代码每发送10000条数据休息1秒钟,制作快照时将到目前为止已经发送的数据的条数保存在UDFState中;从快照中状态恢复时,读取UDFState中的数据条数并重新赋值给count变量。import org.apache.flink.api.java.tuple.Tuple4; import org.apache.flink.streaming.api.checkpoint.ListCheckpointed; import org.apache.flink.streaming.api.functions.source.RichSourceFunction; import java.util.ArrayList; import java.util.List; import java.util.Random; // 该类是带checkpoint的source算子 public class SEventSourceWithChk extends RichSourceFunction<Tuple4<Long, String, String, Integer>> implements ListCheckpointed<UDFState> { private Long count = 0L; private boolean isRunning = true; private String alphabet = “abcdefghijklmnopqrstuvwxyzABCDEFGHIJKLMNOPQRSTUVWXYZ0123456789abcdefghijklmnopqrstuvwxyzABCDEFGHIJKLMNOPQRSTUVWZYX0987654321”; // 算子的主要逻辑,每秒钟向流图中注入10000个元组 public void run(SourceContext<Tuple4<Long, String, String, Integer>> ctx) throws Exception { Random random = new Random(); while(isRunning) { for (int i = 0; i < 10000; i++) { ctx.collect(Tuple4.of(random.nextLong(), “hello-” + count, alphabet, 1)) count++; } Thread.sleep(1000); } } // 任务取消时调用 public void cancel() { isRunning = false; } // 制作自定义快照 public List<UDFState> snapshotState(long l, long ll) throws Exception { UDFState udfState = new UDFState(); List<UDFState> listState = new ArrayList<UDFState>(); udfState.setState(count); listState.add(udfState); return listState; } // 从自定义快照中恢复数据 public void restoreState(List<UDFState> list) throws Exception { UDFState udfState = list.get(0); count = udfState.getState(); } }
  3. 带checkpoint的窗口定义 该段代码是window算子的代码,每当触发计算时统计窗口中元组数量。import org.apache.flink.api.java.tuple.Tuple; import org.apache.flink.api.java.tuple.Tuple4; import org.apache.flink.streaming.api.checkpoint.ListCheckpointed; import org.apache.flink.streaming.api.functions.windowing.WindowFunction; import org.apache.flink.streaming.api.windowing.windows.TimeWindow; import org.apache.flink.util.Collector; import java.util.ArrayList; import java.util.List; // 该类是带checkpoint的window算子 public class WindowStatisticWithChk implements WindowFunction<Tuple4<Long, String, String, Integer>, Long, Tuple, TimeWindow>, ListCheckpointed<UDFState> { private Long total = 0L; // window算子实现逻辑,统计window中元组的个数 void apply(Tuple key, TimeWindow window, Iterable<Tuple4<Long, String, String, Integer>> input, Collector<Long> out) throws Exception { long count = 0L; for (Tuple4<Long, String, String, Integer> event : input) { count++; } total += count; out.collect(count); } // 制作自定义快照 public List<UDFState> snapshotState(Long l, Long ll) { List<UDFState> listState = new ArrayList<UDFState>(); UDFState udfState = new UDFState(); udfState.setState(total); listState.add(udfState); return listState; } // 从自定义快照中恢复状态 public void restoreState(List<UDFState> list) throws Exception { UDFState udfState = list.get(0); total = udfState.getState(); } }
  4. 应用代码 该段代码是流图定义代码,具体实现业务流程,另外,代码中窗口的触发时间使用了processing time。import org.apache.flink.runtime.state.filesystem.FsStateBackend; import org.apache.flink.streaming.api.CheckpointingMode; import org.apache.flink.streaming.api.environment.StreamExecutionEnvironment; import org.apache.flink.streaming.api.windowing.assigners.SlidingProcessingTimeWindows; import org.apache.flink.streaming.api.windowing.time.Time; public class FlinkProcessingTimeAPIChkMain { public static void main(String[] args) throws Exception{ StreamExecutionEnvironment env = StreamExecutionEnvironment.getExecutionEnvironment(); // 设置相关配置,并开启checkpoint功能 env.setStateBackend(new FsStateBackend(“hdfs://hacluster/flink-checkpoint/checkpoint/”)); env.getCheckpointConfig.setCheckpointingMode(CheckpointingMode.EXACTLY_ONCE); env.getCheckpointConfig.setCheckpointInterval(6000); // 应用逻辑 env.addSource(new SEventSourceWithChk()) .keyBy(0) .window(SlidingProcessingTimeWindows.of(Time.seconds(4), Time.seconds(1))) .apply(new WindowStatisticWithChk()) .print() env.execute(); } }

Scala样例代码

功能介绍

假定用户需要每隔1秒钟需要统计4秒中窗口中数据的量,并做到状态严格一致性。

代码样例

  1. 发送数据形式case class SEvent(id: Long, name: String, info: String, count: Int)
  2. 快照数据 该数据在算子制作快照时用于保存到目前为止算子记录的数据条数。// 用户自定义状态 class UDFState extends Serializable{ private var count = 0L // 设置用户自定义状态 def setState(s: Long) = count = s // 获取用户自定状态 def getState = count }
  3. 带checkpoint的数据源 source算子的代码,该段代码每发送10000条数据休息1秒钟,制作快照时将到目前为止已经发送的数据的条数保存在UDFState中;从快照中状态恢复时,读取UDFState中的数据条数并重新赋值给count变量。import java.util import org.apache.flink.streaming.api.checkpoint.ListCheckpointed import org.apache.flink.streaming.api.functions.source.RichSourceFunction import org.apache.flink.streaming.api.functions.source.SourceFunction.SourceContext // 该类是带有checkpoint的source算子 class SEventSourceWithChk extends RichSourceFunction[SEvent] with ListCheckpointed[UDFState]{ private var count = 0L private var isRunning = true private val alphabet = “abcdefghijklmnopqrstuvwxyzABCDEFGHIJKLMNOPQRSTUVWXYZ0123456789abcdefghijklmnopqrstuvwxyzABCDEFGHIJKLMNOPQRSTUVWZYX0987654321” // source算子的逻辑,即:每秒钟向流图中注入10000个元组 override def run(sourceContext: SourceContext[SEvent]): Unit = { while(isRunning) { for (i <- 0 until 10000) { sourceContext.collect(SEvent(1, “hello-“+count, alphabet,1)) count += 1L } Thread.sleep(1000) } } // 任务取消时调用 override def cancel(): Unit = { isRunning = false; } override def close(): Unit = super.close() // 制作快照 override def snapshotState(l: Long, l1: Long): util.List[UDFState] = { val udfList: util.ArrayList[UDFState] = new util.ArrayList[UDFState] val udfState = new UDFState udfState.setState(count) udfList.add(udfState) udfList } // 从快照中获取状态 override def restoreState(list: util.List[UDFState]): Unit = { val udfState = list.get(0) count = udfState.getState } }
  4. 带checkpoint的窗口定义 该段代码是window算子的代码,每当触发计算时统计窗口中元组数量。import java.util import org.apache.flink.api.java.tuple.Tuple import org.apache.flink.streaming.api.checkpoint.ListCheckpointed import org.apache.flink.streaming.api.scala.function.WindowFunction import org.apache.flink.streaming.api.windowing.windows.TimeWindow import org.apache.flink.util.Collector // 该类是带checkpoint的window算子 class WindowStatisticWithChk extends WindowFunction[SEvent, Long, Tuple, TimeWindow] with ListCheckpointed[UDFState]{ private var total = 0L // window算子的实现逻辑,即:统计window中元组的数量 override def apply(key: Tuple, window: TimeWindow, input: Iterable[SEvent], out: Collector[Long]): Unit = { var count = 0L for (event <- input) { count += 1L } total += count out.collect(count) } // 制作自定义状态快照 override def snapshotState(l: Long, l1: Long): util.List[UDFState] = { val udfList: util.ArrayList[UDFState] = new util.ArrayList[UDFState] val udfState = new UDFState udfState.setState(total) udfList.add(udfState) udfList } // 从自定义快照中恢复状态 override def restoreState(list: util.List[UDFState]): Unit = { val udfState = list.get(0) total = udfState.getState } }
  5. 应用代码 该段代码是流图定义代码,具体实现业务流程,另外,代码中窗口的触发时间使用了event time。import com.hauwei.rt.flink.core.{SEvent, SEventSourceWithChk, WindowStatisticWithChk} import org.apache.flink.contrib.streaming.state.RocksDBStateBackend import org.apache.flink.streaming.api.functions.AssignerWithPeriodicWatermarks import org.apache.flink.streaming.api.{CheckpointingMode, TimeCharacteristic} import org.apache.flink.streaming.api.scala.StreamExecutionEnvironment import org.apache.flink.streaming.api.watermark.Watermark import org.apache.flink.streaming.api.windowing.assigners.SlidingEventTimeWindows import org.apache.flink.streaming.api.windowing.time.Time import org.apache.flink.api.scala._ import org.apache.flink.runtime.state.filesystem.FsStateBackend import org.apache.flink.streaming.api.environment.CheckpointConfig.ExternalizedCheckpointCleanup object FlinkEventTimeAPIChkMain { def main(args: Array[String]): Unit ={ val env = StreamExecutionEnvironment.getExecutionEnvironment env.setStateBackend(new FsStateBackend(“hdfs://hacluster/flink-checkpoint/checkpoint/”)) env.setStreamTimeCharacteristic(TimeCharacteristic.EventTime) env.getConfig.setAutoWatermarkInterval(2000) env.getCheckpointConfig.setCheckpointingMode(CheckpointingMode.EXACTLY_ONCE) env.getCheckpointConfig.setCheckpointInterval(6000) // 应用逻辑 env.addSource(new SEventSourceWithChk) .assignTimestampsAndWatermarks(new AssignerWithPeriodicWatermarks[SEvent] { // 设置watermark override def getCurrentWatermark: Watermark = { new Watermark(System.currentTimeMillis()) } // 给每个元组打上时间戳 override def extractTimestamp(t: SEvent, l: Long): Long = { System.currentTimeMillis() } }) .keyBy(0) .window(SlidingEventTimeWindows.of(Time.seconds(4), Time.seconds(1))) .apply(new WindowStatisticWithChk) .print() env.execute() } }
作者 east
Flink 3月 1,2021

Flink向Kafka生产并消费数据程序

场景说明

假定某个Flink业务每秒就会收到1个消息记录。

基于某些业务要求,开发的Flink应用程序实现功能:实时输出带有前缀的消息内容。

数据规划

Flink样例工程的数据存储在Kafka组件中。向Kafka组件发送数据(需要有Kafka权限用户),并从Kafka组件接收数据。

  1. 确保集群安装完成,包括HDFS、Yarn、Flink和Kafka。
  2. 创建Topic。 创建topic的命令格式: bin/kafka-topics.sh –create –zookeeper {zkQuorum}/kafka –partitions {partitionNum} –replication-factor {replicationNum} –topic {Topic}

开发思路

  1. 启动Flink Kafka Producer应用向Kafka发送数据。
  2. 启动Flink Kafka Consumer应用从Kafka接收数据,保证topic与producer一致。
  3. 在数据内容中增加前缀并进行打印。

java版代码:

Java样例代码


//producer代码 public class WriteIntoKafka { public static void main(String[] args) throws Exception { // 打印出执行flink run的参考命令 System.out.println("use command as: "); System.out.println("./bin/flink run --class com.huawei.bigdata.flink.examples.WriteIntoKafka" + " /opt/test.jar --topic topic-test --bootstrap.servers 10.91.8.218:21005"); System.out.println("******************************************************************************************"); System.out.println("<topic> is the kafka topic name"); System.out.println("<bootstrap.servers> is the ip:port list of brokers"); System.out.println("******************************************************************************************"); // 构造执行环境 StreamExecutionEnvironment env = StreamExecutionEnvironment.getExecutionEnvironment(); // 设置并发度 env.setParallelism(1); // 解析运行参数 ParameterTool paraTool = ParameterTool.fromArgs(args); // 构造流图,将自定义Source生成的数据写入Kafka DataStream<String> messageStream = env.addSource(new SimpleStringGenerator()); messageStream.addSink(new FlinkKafkaProducer010<>(paraTool.get("topic"), new SimpleStringSchema(), paraTool.getProperties())); // 调用execute触发执行 env.execute(); } // 自定义Source,每隔1s持续产生消息 public static class SimpleStringGenerator implements SourceFunction<String> { private static final long serialVersionUID = 2174904787118597072L; boolean running = true; long i = 0; @Override public void run(SourceContext<String> ctx) throws Exception { while (running) { ctx.collect("element-" + (i++)); Thread.sleep(1000); } } @Override public void cancel() { running = false; } } } //consumer代码 public class ReadFromKafka { public static void main(String[] args) throws Exception { // 打印出执行flink run的参考命令 System.out.println("use command as: "); System.out.println("./bin/flink run --class com.huawei.bigdata.flink.examples.ReadFromKafka" + " /opt/test.jar --topic topic-test -bootstrap.servers 10.91.8.218:21005"); System.out.println("******************************************************************************************"); System.out.println("<topic> is the kafka topic name"); System.out.println("<bootstrap.servers> is the ip:port list of brokers"); System.out.println("******************************************************************************************"); // 构造执行环境 StreamExecutionEnvironment env = StreamExecutionEnvironment.getExecutionEnvironment(); // 设置并发度 env.setParallelism(1); // 解析运行参数 ParameterTool paraTool = ParameterTool.fromArgs(args); // 构造流图,从Kafka读取数据并换行打印 DataStream<String> messageStream = env.addSource(new FlinkKafkaConsumer010<>(paraTool.get("topic"), new SimpleStringSchema(), paraTool.getProperties())); messageStream.rebalance().map(new MapFunction<String, String>() { @Override public String map(String s) throws Exception { return "Flink says " + s + System.getProperty("line.separator"); } }).print(); // 调用execute触发执行 env.execute(); } }

scala版本代码:

Scala样例代码


//producer代码 object WriteIntoKafka { def main(args: Array[String]) { // 打印出执行flink run的参考命令 System.out.println("use command as: ") System.out.println("./bin/flink run --class com.huawei.bigdata.flink.examples.WriteIntoKafka" + " /opt/test.jar --topic topic-test --bootstrap.servers 10.91.8.218:21005") System.out.println("******************************************************************************************") System.out.println("<topic> is the kafka topic name") System.out.println("<bootstrap.servers> is the ip:port list of brokers") System.out.println("******************************************************************************************") // 构造执行环境 val env = StreamExecutionEnvironment.getExecutionEnvironment // 设置并发度 env.setParallelism(1) // 解析运行参数 val paraTool = ParameterTool.fromArgs(args) // 构造流图,将自定义Source生成的数据写入Kafka val messageStream: DataStream[String] = env.addSource(new SimpleStringGenerator) messageStream.addSink(new FlinkKafkaProducer010( paraTool.get("topic"), new SimpleStringSchema, paraTool.getProperties)) // 调用execute触发执行 env.execute } } // 自定义Source,每隔1s持续产生消息 class SimpleStringGenerator extends SourceFunction[String] { var running = true var i = 0 override def run(ctx: SourceContext[String]) { while (running) { ctx.collect("element-" + i) i += 1 Thread.sleep(1000) } } override def cancel() { running = false } } //consumer代码 object ReadFromKafka { def main(args: Array[String]) { // 打印出执行flink run的参考命令 System.out.println("use command as: ") System.out.println("./bin/flink run --class com.huawei.bigdata.flink.examples.ReadFromKafka" + " /opt/test.jar --topic topic-test -bootstrap.servers 10.91.8.218:21005") System.out.println("******************************************************************************************") System.out.println("<topic> is the kafka topic name") System.out.println("<bootstrap.servers> is the ip:port list of brokers") System.out.println("******************************************************************************************") // 构造执行环境 val env = StreamExecutionEnvironment.getExecutionEnvironment // 设置并发度 env.setParallelism(1) // 解析运行参数 val paraTool = ParameterTool.fromArgs(args) // 构造流图,从Kafka读取数据并换行打印 val messageStream = env.addSource(new FlinkKafkaConsumer010( paraTool.get("topic"), new SimpleStringSchema, paraTool.getProperties)) messageStream .map(s => "Flink says " + s + System.getProperty("line.separator")).print() // 调用execute触发执行 env.execute() } }
作者 east
Flink 3月 1,2021

Flink统计连续网购时间超过2个小时的女性网民信息例子

Java样例代码

场景说明

场景说明

假定用户有某个网站周末网民网购停留时间的日志文本,基于某些业务要求,要求开发Flink的DataStream应用程序实现如下功能:

说明:

DataStream应用程序可以在Windows环境和Linux环境中运行。

  • 实时统计总计网购时间超过2个小时的女性网民信息。
  • 周末两天的日志文件第一列为姓名,第二列为性别,第三列为本次停留时间,单位为分钟,分隔符为“,”。 log1.txt:周六网民停留日志。LiuYang,female,20 YuanJing,male,10 GuoYijun,male,5 CaiXuyu,female,50 Liyuan,male,20 FangBo,female,50 LiuYang,female,20 YuanJing,male,10 GuoYijun,male,50 CaiXuyu,female,50 FangBo,female,60
  • log2.txt:周日网民停留日志。LiuYang,female,20 YuanJing,male,10 CaiXuyu,female,50 FangBo,female,50 GuoYijun,male,5 CaiXuyu,female,50 Liyuan,male,20 CaiXuyu,female,50 FangBo,female,50 LiuYang,female,20 YuanJing,male,10 FangBo,female,50 GuoYijun,male,50 CaiXuyu,female,50 FangBo,female,60

数据规划

DataStream样例工程的数据存储在文本中。

将log1.txt和log2.txt放置在某路径下,例如”/opt/log1.txt”和”/opt/log2.txt”。

开发思路

统计日志文件中本周末网购停留总时间超过2个小时的女性网民信息。

主要分为四个部分:

  1. 读取文本数据,生成相应DataStream,解析数据生成UserRecord信息。
  2. 筛选女性网民上网时间数据信息。
  3. 按照姓名、性别进行keyby操作,并汇总在一个时间窗口内每个女性上网时间。
  4. 筛选连续上网时间超过阈值的用户,并获取结果。

功能介绍

统计连续网购时间超过2个小时的女性网民信息,将统计结果直接打印。

java版代码:

Java样例代码


// 参数解析: // <filePath>为文本读取路径,用逗号分隔。 // <windowTime>为统计数据的窗口跨度,时间单位都是分。 public class FlinkStreamJavaExample { public static void main(String[] args) throws Exception { // 打印出执行flink run的参考命令 System.out.println("use command as: "); System.out.println("./bin/flink run --class com.huawei.bigdata.flink.examples.FlinkStreamJavaExample /opt/test.jar --filePath /opt/log1.txt,/opt/log2.txt --windowTime 2"); System.out.println("******************************************************************************************"); System.out.println("<filePath> is for text file to read data, use comma to separate"); System.out.println("<windowTime> is the width of the window, time as minutes"); System.out.println("******************************************************************************************"); // 读取文本路径信息,并使用逗号分隔 final String[] filePaths = ParameterTool.fromArgs(args).get("filePath", "/opt/log1.txt,/opt/log2.txt").split(","); assert filePaths.length > 0; // windowTime设置窗口时间大小,默认2分钟一个窗口足够读取文本内的所有数据了 final int windowTime = ParameterTool.fromArgs(args).getInt("windowTime", 2); // 构造执行环境,使用eventTime处理窗口数据 final StreamExecutionEnvironment env = StreamExecutionEnvironment.getExecutionEnvironment(); env.setStreamTimeCharacteristic(TimeCharacteristic.EventTime); env.setParallelism(1); // 读取文本数据流 DataStream<String> unionStream = env.readTextFile(filePaths[0]); if (filePaths.length > 1) { for (int i = 1; i < filePaths.length; i++) { unionStream = unionStream.union(env.readTextFile(filePaths[i])); } } // 数据转换,构造整个数据处理的逻辑,计算并得出结果打印出来 unionStream.map(new MapFunction<String, UserRecord>() { @Override public UserRecord map(String value) throws Exception { return getRecord(value); } }).assignTimestampsAndWatermarks( new Record2TimestampExtractor() ).filter(new FilterFunction<UserRecord>() { @Override public boolean filter(UserRecord value) throws Exception { return value.sexy.equals("female"); } }).keyBy( new UserRecordSelector() ).window( TumblingEventTimeWindows.of(Time.minutes(windowTime)) ).reduce(new ReduceFunction<UserRecord>() { @Override public UserRecord reduce(UserRecord value1, UserRecord value2) throws Exception { value1.shoppingTime += value2.shoppingTime; return value1; } }).filter(new FilterFunction<UserRecord>() { @Override public boolean filter(UserRecord value) throws Exception { return value.shoppingTime > 120; } }).print(); // 调用execute触发执行 env.execute("FemaleInfoCollectionPrint java"); } // 构造keyBy的关键字作为分组依据 private static class UserRecordSelector implements KeySelector<UserRecord, Tuple2<String, String>> { @Override public Tuple2<String, String> getKey(UserRecord value) throws Exception { return Tuple2.of(value.name, value.sexy); } } // 解析文本行数据,构造UserRecord数据结构 private static UserRecord getRecord(String line) { String[] elems = line.split(","); assert elems.length == 3; return new UserRecord(elems[0], elems[1], Integer.parseInt(elems[2])); } // UserRecord数据结构的定义,并重写了toString打印方法 public static class UserRecord { private String name; private String sexy; private int shoppingTime; public UserRecord(String n, String s, int t) { name = n; sexy = s; shoppingTime = t; } public String toString() { return "name: " + name + " sexy: " + sexy + " shoppingTime: " + shoppingTime; } } // 构造继承AssignerWithPunctuatedWatermarks的类,用于设置eventTime以及waterMark private static class Record2TimestampExtractor implements AssignerWithPunctuatedWatermarks<UserRecord> { // add tag in the data of datastream elements @Override public long extractTimestamp(UserRecord element, long previousTimestamp) { return System.currentTimeMillis(); } // give the watermark to trigger the window to execute, and use the value to check if the window elements is ready @Override public Watermark checkAndGetNextWatermark(UserRecord element, long extractedTimestamp) { return new Watermark(extractedTimestamp - 1); } } }

scala版本:

Scala样例代码


// 参数解析: // filePath为文本读取路径,用逗号分隔。 // windowTime;为统计数据的窗口跨度,时间单位都是分。 object FlinkStreamScalaExample { def main(args: Array[String]) { // 打印出执行flink run的参考命令 System.out.println("use command as: ") System.out.println("./bin/flink run --class com.huawei.bigdata.flink.examples.FlinkStreamScalaExample /opt/test.jar --filePath /opt/log1.txt,/opt/log2.txt --windowTime 2") System.out.println("******************************************************************************************") System.out.println("<filePath> is for text file to read data, use comma to separate") System.out.println("<windowTime> is the width of the window, time as minutes") System.out.println("******************************************************************************************") // 读取文本路径信息,并使用逗号分隔 val filePaths = ParameterTool.fromArgs(args).get("filePath", "/opt/log1.txt,/opt/log2.txt").split(",").map(_.trim) assert(filePaths.length > 0) // windowTime设置窗口时间大小,默认2分钟一个窗口足够读取文本内的所有数据了 val windowTime = ParameterTool.fromArgs(args).getInt("windowTime", 2) // 构造执行环境,使用eventTime处理窗口数据 val env = StreamExecutionEnvironment.getExecutionEnvironment env.setStreamTimeCharacteristic(TimeCharacteristic.EventTime) env.setParallelism(1) // 读取文本数据流 val unionStream = if (filePaths.length > 1) { val firstStream = env.readTextFile(filePaths.apply(0)) firstStream.union(filePaths.drop(1).map(it => env.readTextFile(it)): _*) } else { env.readTextFile(filePaths.apply(0)) } // 数据转换,构造整个数据处理的逻辑,计算并得出结果打印出来 unionStream.map(getRecord(_)) .assignTimestampsAndWatermarks(new Record2TimestampExtractor) .filter(_.sexy == "female") .keyBy("name", "sexy") .window(TumblingEventTimeWindows.of(Time.minutes(windowTime))) .reduce((e1, e2) => UserRecord(e1.name, e1.sexy, e1.shoppingTime + e2.shoppingTime)) .filter(_.shoppingTime > 120).print() // 调用execute触发执行 env.execute("FemaleInfoCollectionPrint scala") } // 解析文本行数据,构造UserRecord数据结构 def getRecord(line: String): UserRecord = { val elems = line.split(",") assert(elems.length == 3) val name = elems(0) val sexy = elems(1) val time = elems(2).toInt UserRecord(name, sexy, time) } // UserRecord数据结构的定义 case class UserRecord(name: String, sexy: String, shoppingTime: Int) // 构造继承AssignerWithPunctuatedWatermarks的类,用于设置eventTime以及waterMark private class Record2TimestampExtractor extends AssignerWithPunctuatedWatermarks[UserRecord] { // add tag in the data of datastream elements override def extractTimestamp(element: UserRecord, previousTimestamp: Long): Long = { System.currentTimeMillis() } // give the watermark to trigger the window to execute, and use the value to check if the window elements is ready def checkAndGetNextWatermark(lastElement: UserRecord, extractedTimestamp: Long): Watermark = { new Watermark(extractedTimestamp - 1) } } }
作者 east
solr 3月 1,2021

Solr增删改查例子

Solr初始化

Solr初始化

功能简介

Solr初始化是指在使用Solr提供的API之前,需要做的必要工作。目的是取得与SolrCoud的连接。

说明:

在进行完Solr操作后,需要调用cloudSolrClient.close()关闭所申请的资源。

Solr初始化


/** *初始化CloudSolrClient实例,连接SolrCloud private CloudSolrClient getCloudSolrClient(String zkHost) throws SolrException { Builder builder = new CloudSolrClient.Builder(); builder.withZkHost(zkHost); CloudSolrClient cloudSolrClient = builder.build(); cloudSolrClient.setZkClientTimeout(zkClientTimeout); cloudSolrClient.setZkConnectTimeout(zkConnectTimeout); cloudSolrClient.connect(); LOG.info("The cloud Server has been connected !!!!"); ZkStateReader zkStateReader = cloudSolrClient.getZkStateReader(); ClusterState cloudState = zkStateReader.getClusterState(); LOG.info("The zookeeper state is : {}", cloudState); return cloudSolrClient; }

查询collection

查询collection

功能简介

通过调用CollectionAdminRequest.List的process(cloudSolrClient)并调用返回的response来获取所有collection的名字。

代码样例

private List<String> queryAllCollections(CloudSolrClient 
                             cloudSolrClient) throws SolrException {
        CollectionAdminRequest.List list = 
        new CollectionAdminRequest.List();
        CollectionAdminResponse listRes = null;
        try {
            listRes = list.process(cloudSolrClient);
        } catch (SolrServerException | IOException e) {
            LOG.error("Failed to list collection", e);
            throw new SolrException("Failed to list collection");
        } catch (Exception e) {
            LOG.error("Failed to list collection", e);
            throw new SolrException("unknown exception");
        }

        List<String> collectionNames = (List<String>) 
        listRes.getResponse().get("collections");
        LOG.info("All existed collections : {}", collectionNames);
        return collectionNames;
    }

删除collection

删除collection

功能简介

通过调用CollectionAdminRequest.Delete的process(cloudSolrClient)并调用返回的response来判断是否执行删除collection操作成功。

代码样例

private void deleteCollection(CloudSolrClient cloudSolrClient) 
                                               throws SolrException {
        CollectionAdminRequest.Delete delete = 
        new CollectionAdminRequest.Delete();
        delete.setCollectionName(COLLECTION_NAME);
        CollectionAdminResponse response = null;
        try {
            response = delete.process(cloudSolrClient);
        } catch (SolrServerException | IOException e) {
            LOG.error("Failed to delete collection", e);
            throw new SolrException("Failed to create collection");
        } catch (Exception e) {
            LOG.error("Failed to delete collection", e);
            throw new SolrException("unknown exception");
        }
        if (response.isSuccess()) {
            LOG.info("Success to delete collection[{}]", 
            COLLECTION_NAME);
        } else {
            LOG.error("Failed to delete collection[{}], cause : {}",             COLLECTION_NAME, response.getErrorMessages());
            throw new SolrException("Failed to delete collection");
        }
    }

创建collection

创建collection

功能简介

通过调用CollectionAdminRequest.Create的process(cloudSolrClient)并调用返回的response来判断是否执行创建collection操作成功。

代码样例

  private void createCollection(CloudSolrClient cloudSolrClient) throws SolrException {
        CollectionAdminRequest.Create create = CollectionAdminRequest.createCollection(COLLECTION_NAME, DEFAULT_CONFIG_NAME, shardNum, replicaNum);
        CollectionAdminResponse response = null;
        try {
            response = create.process(cloudSolrClient);
        } catch (SolrServerException e) {
            LOG.error("Failed to create collection", e);
            throw new SolrException("Failed to create collection");
        } catch (IOException e) {
            LOG.error("Failed to create collection", e);
            throw new SolrException("Failed to create collection");
        } catch (Exception e) {
            LOG.error("Failed to create collection", e);
            throw new SolrException("unknown exception");
        }
        if (response.isSuccess()) {
            LOG.info("Success to create collection[{}]", COLLECTION_NAME);
        } else {
            LOG.error("Failed to create collection[{}], cause : {}", COLLECTION_NAME, response.getErrorMessages());
            throw new SolrException("Failed to create collection");
        }
    }

添加Doc

添加Doc

功能简介

通过调用cloudSolrClient的add方法或者构造UpdateRequest调用cloudSolrClient的request方法来添加索引数据。

代码样例1

private void addDocs(CloudSolrClient cloudSolrClient) throws SolrException {
        Collection<SolrInputDocument> documents = new ArrayList<SolrInputDocument>();
        for (Integer i = 0; i < 5; i++) {
            SolrInputDocument doc = new SolrInputDocument();
            doc.addField("id", i.toString());
            doc.addField("name", "Luna_" + i);
            doc.addField("features", "test" + i);
            doc.addField("price", (float) i * 1.01);
            documents.add(doc);
        }
        try {
            cloudSolrClient.add(documents);
            LOG.info("success to add index");
        } catch (SolrServerException e) {
            LOG.error("Failed to add document to collection", e);
            throw new SolrException("Failed to add document to collection");
        } catch (IOException e) {
            LOG.error("Failed to add document to collection", e);
            throw new SolrException("Failed to add document to collection");
        } catch (Exception e) {
            LOG.error("Failed to add document to collection", e);
            throw new SolrException("unknown exception");
        }
    }

代码样例2

private void addDocs2(CloudSolrClient cloudSolrClient) throws 
SolrException{
    UpdateRequest request = new UpdateRequest();
    Collection<SolrInputDocument> documents = new ArrayList<>();
    for (Integer i = 5; i < 10; i++) {
        SolrInputDocument doc = new SolrInputDocument();
        doc.addField("id", i.toString());
        doc.addField("name", "张三" + i);
        doc.addField("features", "test" + i);
        doc.addField("price", (float) i * 1.01);
        documents.add(doc);
     }
     request.add(documents);
    try {
        cloudSolrClient.request(request);
        cloudSolrClient.commit();
    } catch (SolrServerException | IOException e) {
        LOG.error("Failed to add document to collection", e);
        throw new SolrException("Failed to add document to 
        collection");
    }
 }

查询Doc

查询Doc

功能简介

通过构造SolrQuery实例,并调用cloudSolrClient.query接口来查询索引数据。

样例代码

    private void queryIndex(CloudSolrClient cloudSolrClient) throws SolrException {
        SolrQuery query = new SolrQuery();
        query.setQuery("name:Luna*");

        try {
            QueryResponse response = cloudSolrClient.query(query);
            SolrDocumentList docs = response.getResults();
            LOG.info("Query wasted time : {}ms", response.getQTime());

            LOG.info("Total doc num : {}", docs.getNumFound());
            for (SolrDocument doc : docs) {
                LOG.info("doc detail : " + doc.getFieldValueMap());
            }
        } catch (SolrServerException e) {
            LOG.error("Failed to query document", e);
            throw new SolrException("Failed to query document");
        } catch (IOException e) {
            LOG.error("Failed to query document", e);
            throw new SolrException("Failed to query document");
        } catch (Exception e) {
            LOG.error("Failed to query document", e);
            throw new SolrException("unknown exception");
        }
    }

删除Doc

删除Doc

功能简介

通过调用cloudSolrClient.deleteByQuery方法删除指定匹配的索引数据。

代码样例

private void removeIndex(CloudSolrClient cloudSolrClient) throws 
SolrException {
        try {
            cloudSolrClient.deleteByQuery("*:*");
            cloudSolrClient.commit();
            LOG.info("Success to delete index");
        } catch (SolrServerException | IOException e){
            LOG.error("Failed to remove document", e);
            throw new SolrException("Failed to remove document");
        }
    }
作者 east
Hive 3月 1,2021

Hive数据查询

数据查询

功能介绍

本小节介绍了如何使用HQL对数据进行查询分析。从本节中可以掌握如下查询分析方法:

  • SELECT查询的常用特性,如JOIN等。
  • 加载数据进指定分区。
  • 如何使用Hive自带函数。
  • 如何使用自定义函数进行查询分析,如何创建、定义自定义函数请见用户自定义函数。

样例代码

-- 查看薪水支付币种为美元的雇员联系方式. 
SELECT  
a.name,  
b.tel_phone,  
b.email  
FROM employees_info a JOIN employees_contact b  ON(a.id = b.id) WHERE usd_flag='D'; 
 
-- 查询入职时间为2014年的雇员编号、姓名等字段,并将查询结果加载进表employees_info_extended中的入职时间为2014的分区中. 
INSERT OVERWRITE TABLE employees_info_extended PARTITION (entrytime = '2014')  
SELECT  
a.id,  
a.name,  
a.usd_flag,  
a.salary,  
a.deductions,  
a.address, 
b.tel_phone, 
b.email  
FROM employees_info a JOIN employees_contact b ON (a.id = b.id) WHERE a.entrytime = '2014'; 
 
-- 使用Hive中已有的函数COUNT(),统计表employees_info中有多少条记录. 
SELECT COUNT(*) FROM employees_info; 
 
-- 查询使用以“cn”结尾的邮箱的员工信息. 
SELECT a.name, b.tel_phone FROM  employees_info a JOIN employees_contact b ON (a.id = b.id) WHERE b.email like '%cn'; 

扩展使用

  • 配置Hive中间过程的数据加密 指定表的格式为RCFile(推荐使用)或SequenceFile,加密算法为ARC4Codec。SequenceFile是Hadoop特有的文件格式,RCFile是Hive优化的文件格式。RCFile优化了列存储,在对大表进行查询时,综合性能表现比SequenceFile更优。 set hive.exec.compress.output=true; set hive.exec.compress.intermediate=true; set hive.intermediate.compression.codec=org.apache.hadoop.io.encryption.arc4.ARC4Codec;
作者 east
Hive 3月 1,2021

Hive创建表示例

创建表

功能介绍

本小节介绍了如何使用HQL创建内部表、外部表的基本操作。创建表主要有以下三种方式:

  • 自定义表结构,以关键字EXTERNAL区分创建内部表和外部表。
    • 内部表,如果对数据的处理都由Hive完成,则应该使用内部表。在删除内部表时,元数据和数据一起被删除。
    • 外部表,如果数据要被多种工具(如Pig等)共同处理,则应该使用外部表,可避免对该数据的误操作。删除外部表时,只删除掉元数据。
  • 根据已有表创建新表,使用CREATE LIKE句式,完全复制原有的表结构,包括表的存储格式。
  • 根据查询结果创建新表,使用CREATE AS SELECT句式。 这种方式比较灵活,可以在复制原表表结构的同时指定要复制哪些字段,不包括表的存储格式。

样例代码

-- 创建外部表employees_info. 
CREATE EXTERNAL TABLE IF NOT EXISTS employees_info 
( 
id INT, 
name STRING, 
usd_flag STRING, 
salary DOUBLE, 
deductions MAP<STRING, DOUBLE>, 
address STRING, 
entrytime STRING 
) 
-- 指定行中各字段分隔符. 
-- "delimited fields terminated by"指定列与列之间的分隔符为',',"MAP KEYS TERMINATED BY"指定MAP中键值的分隔符为'&'. 
ROW FORMAT delimited fields terminated by ',' MAP KEYS TERMINATED BY '&'  
-- 指定表的存储格式为TEXTFILE. 
STORED AS TEXTFILE;  
 
-- 使用CREATE Like创建表. 
CREATE TABLE employees_like LIKE employees_info; 
 
-- 使用DESCRIBE查看employees_info、employees_like、 employees_as_select表结构. 
DESCRIBE employees_info; 
DESCRIBE employees_like; 

扩展应用

  • 创建分区表 一个表可以拥有一个或者多个分区,每个分区以文件夹的形式单独存在表文件夹的目录下。对分区内数据进行查询,可缩小查询范围,加快数据的检索速度和可对数据按照一定的条件进行管理。 分区是在创建表的时候用PARTITIONED BY子句定义的。 CREATE EXTERNAL TABLE IF NOT EXISTS employees_info_extended ( id INT, name STRING, usd_flag STRING, salary DOUBLE, deductions MAP<STRING, DOUBLE>, address STRING ) — 使用关键字PARTITIONED BY指定分区列名及数据类型 . PARTITIONED BY (entrytime STRING) STORED AS TEXTFILE;
  • 更新表的结构 一个表在创建完成后,还可以使用ALTER TABLE执行增、删字段,修改表属性,添加分区等操作 — 为表employees_info_extended增加tel_phone、email字段. ALTER TABLE employees_info_extended ADD COLUMNS (tel_phone STRING, email STRING);
  • 建表时配置Hive数据加密 指定表的格式为RCFile(推荐使用)或SequenceFile,加密算法为ARC4Codec。SequenceFile是Hadoop特有的文件格式,RCFile是Hive优化的文件格式。RCFile优化了列存储,在对大表进行查询时,综合性能表现比SequenceFile更优。 set hive.exec.compress.output=true; set hive.exec.compress.intermediate=true; set hive.intermediate.compression.codec=org.apache.hadoop.io.encryption.arc4.ARC4Codec; create table seq_Codec (key string, value string) stored as RCFile;
作者 east
Hbase 3月 1,2021

Hbase 基于二级索引的查询

基于二级索引的查询

功能介绍

针对添加了二级索引的用户表,您可以通过Filter来查询数据。其数据查询性能高于针对无二级索引用户表的数据查询。

二级索引的使用规则如下:

  • 针对某一列或者多列创建了单索引的场景下:
    • 当查询时使用此列进行过滤时,不管是AND还是OR操作,该索引都会被利用来提升查询性能。 例如:Filter_Condition(IndexCol1) AND/OR Filter_Condition(IndexCol2)
    • 当查询时使用“索引列AND非索引列”过滤时,此索引会被利用来提升查询性能。 例如:Filter_Condition(IndexCol1) AND Filter_Condition(IndexCol2) AND Filter_Condition(NonIndexCol1)
    • 当查询时使用“索引列OR非索引列”过滤时,此索引将不会被使用,查询性能不会因为索引得到提升。 例如:Filter_Condition(IndexCol1) AND/OR Filter_Condition(IndexCol2) OR Filter_Condition(NonIndexCol1)
  • 针对多个列创建的联合索引场景下:
    • 当查询时使用的列(多个),是联合索引所有对应列的一部分或者全部,且列的顺序与联合索引一致时,此索引会被利用来提升查询性能。 例如,针对C1、C2、C3列创建了联合索引,生效的场景包括: Filter_Condition(IndexCol1) AND Filter_Condition(IndexCol2) AND Filter_Condition(IndexCol3) Filter_Condition(IndexCol1) AND Filter_Condition(IndexCol2) Filter_Condition(IndexCol1) 不生效的场景包括: Filter_Condition(IndexCol2) AND Filter_Condition(IndexCol3) Filter_Condition(IndexCol1) AND Filter_Condition(IndexCol3) Filter_Condition(IndexCol2) Filter_Condition(IndexCol3)
    • 当查询时使用“索引列AND非索引列”过滤时,此索引会被利用来提升查询性能。 例如: Filter_Condition(IndexCol1) AND Filter_Condition(NonIndexCol1) Filter_Condition(IndexCol1) AND Filter_Condition(IndexCol2) AND Filter_Condition(NonIndexCol1)
    • 当查询时使用“索引列OR非索引列”过滤时,此索引不会被使用,查询性能不会因为索引得到提升。 例如: Filter_Condition(IndexCol1) OR Filter_Condition(NonIndexCol1) (Filter_Condition(IndexCol1) AND Filter_Condition(IndexCol2))OR ( Filter_Condition(NonIndexCol1))
    • 当查询时使用多个列进行范围查询时,只有联合索引中最后一个列可指定取值范围,前面的列只能设置为“=”。 例如:针对C1、C2、C3列创建了联合索引,需要进行范围查询时,只能针对C3设置取值范围,过滤条件为“C1=XXX,C2=XXX,C3=取值范围”。
  • 针对添加了二级索引的用户表,可以通过Filter来查询数据,在单列索引和复合列索引上进行过滤查询,查询结果都与无索引结果相同,且其数据查询性能高于无二级索引用户表的数据查询性能。

代码样例

下面代码片段在com.huawei.hadoop.hbase.example包的“HBaseSample”类的testScanDataByIndex方法中:

样例:使用二级索引查找数据

  public void testScanDataByIndex() {
    LOG.info("Entering testScanDataByIndex.");
    Table table = null;
    ResultScanner scanner = null;
    try {
      table = conn.getTable(tableName);
      
      // Create a filter for indexed column.
      Filter filter = new SingleColumnValueFilter(Bytes.toBytes("info"), Bytes.toBytes("name"),
          CompareOp.EQUAL, "Li Gang".getBytes());
      Scan scan = new Scan();
      scan.setFilter(filter);
      scanner = table.getScanner(scan);
      LOG.info("Scan indexed data.");
      
      for (Result result : scanner) {
        for (Cell cell : result.rawCells()) {
          LOG.info(Bytes.toString(CellUtil.cloneRow(cell)) + ":"
              + Bytes.toString(CellUtil.cloneFamily(cell)) + ","
              + Bytes.toString(CellUtil.cloneQualifier(cell)) + ","
              + Bytes.toString(CellUtil.cloneValue(cell)));
        }
      }
      LOG.info("Scan data by index successfully.");
    } catch (IOException e) {
      LOG.error("Scan data by index failed.");
    } finally {
      if (scanner != null) {
        // Close the scanner object.
        scanner.close();
      }
      try {
        if (table != null) {
          table.close();
        }
      } catch (IOException e) {
        LOG.error("Close table failed.");
      }
    }
    
    LOG.info("Exiting testScanDataByIndex.");
  }

注意事项

需要预先对字段name创建二级索引。

相关操作

基于二级索引表查询。

查询样例如下:

用户在hbase_sample_table的info列族的name列添加一个索引,在客户端执行,

hbase org.apache.hadoop.hbase.hindex.mapreduce.TableIndexer -Dtablename.to.index=hbase_sample_table -Dindexspecs.to.add='IDX1=>info:[name->String]'

然后用户需要查询“info:name”,在hbase shell执行如下命令:

>scan ‘hbase_sample_table’,{FILTER=>”SingleColumnValueFilter(family,qualifier,compareOp,comparator,filterIfMissing,latestVersionOnly)”}

说明:

hbase shell下面做复杂的查询请使用API进行处理。

参数说明:

  • family:需要查询的列所在的列族,例如info;
  • qualifier:需要查询的列,例如name;
  • compareOp:比较符,例如=、>等;
  • comparator:需要查找的目标值,例如binary:Zhang San;
  • filterIfMissing:如果某一行不存在该列,是否过滤,默认值为false;
  • latestVersionOnly:是否仅查询最新版本的值,默认值为false。

例如:

>scan 'hbase_sample_table',{FILTER=>"SingleColumnValueFilter('info','name',=,'binary:Zhang San',true,true)"}
作者 east
Hbase 3月 1,2021

Hbase创建二级索引

创建二级索引

功能简介

一般都通过调用org.apache.hadoop.hbase.hindex.client.HIndexAdmin中方法进行HBase二级索引的管理,该类中提供了创建索引的方法。

说明:

二级索引不支持修改,如果需要修改,请先删除旧的然后重新创建。

代码样例

以下代码片段在com.huawei.bigdata.hbase.examples包的“HBaseSample”类的createIndex方法中。

public void createIndex() {     
LOG.info("Entering createIndex.");
String indexName = "index_name";
// Create index instance
TableIndices tableIndices = new TableIndices();
IndexSpecification iSpec = new IndexSpecification(indexName); iSpec.addIndexColumn(new HColumnDescriptor("info"), "name", ValueType.String);//注[1]
tableIndices.addIndex(iSpec);
HIndexAdmin iAdmin = null;
Admin admin = null;
try {
admin = conn.getAdmin();
iAdmin = new IndexAdmin(conf);
// add index to the table
iAdmin.addIndices(tableName, tableIndices);
LOG.info("Create index successfully.");
} catch (IOException e) {
LOG.error("Create index failed " ,e);
} finally {
if (admin != null) {
try {
admin.close();
} catch (IOException e) {
LOG.error("Close admin failed " ,e);
}
}
if (iAdmin != null) {
try {
// Close IndexAdmin Object
iAdmin.close();
} catch (IOException e) {
LOG.error("Close admin failed " ,e);
}
}
}
LOG.info("Exiting createIndex.");
}

新创建的二级索引默认是不启用的,如果需要启用指定的二级索引,可以参考如下代码片段。该代码片段在com.huawei.bigdata.hbase.examples包的“HBaseSample”类的enableIndex方法中。

  public void enableIndex() {
    LOG.info("Entering createIndex.");

    // Name of the index to be enabled
    String indexName = "index_name";

    List<String> indexNameList = new ArrayList<String>();
    indexNameList.add(indexName);
    HIndexAdmin iAdmin = null;
    try {
      iAdmin = HIndexClient.newHIndexAdmin(conn.getAdmin());
      // Alternately, enable the specified indices
      iAdmin.enableIndices(tableName, indexNameList);
      System.out.println("Successfully enable indices " + indexNameList + " of the table " + tableName);
    } catch (IOException e) {
      System.out.println("Failed to enable indices " + indexNameList + " of the table " + tableName + "." + e);
    } finally {
      if (iAdmin != null) {
        try {
          iAdmin.close();
        } catch (IOException e) {
          LOG.error("Close admin failed ", e);
        }
      }
    }
  }

注意事项

注[1]:创建联合索引

HBase支持在多个字段上创建二级索引,例如在列name和age上。

HIndexSpecification iSpecUnite = new HIndexSpecification(indexName); 
 iSpecUnite.addIndexColumn(new HColumnDescriptor("info"), "name", ValueType.String); 
 iSpecUnite.addIndexColumn(new HColumnDescriptor("info"), "age", ValueType.String);

相关操作

使用命令创建索引表。

您还可以通过TableIndexer工具在已有用户表中创建索引。

说明:

<table_name>用户表必须存在。

hbase org.apache.hadoop.hbase.index.mapreduce.TableIndexer -Dindexspecs.to.add=<table_name> -Dtable.columns.index='IDX1=>cf1:[q1->datatype&length];cf2:[q1->datatype],[q2->datatype],[q3->datatype]#IDX2=>cf1:[q5->datatype&length]

“#”用于区分不同的索引,“;”用于区分不同的列族,“,”用于区分不同的列。

tablename.to.index:创建索引的用户表表名。

indexspecs.to.add:创建索引对应的用户表列。

其中命令中各参数的含义如下:

  • IDX1:索引名称
  • cf1:列族名称。
  • q1:列名。
  • datatype:数据类型。数据类型仅支持Integer、String、Double、Float、Long、Short、Byte、Char类型。
作者 east
Hbase 3月 1,2021

HBase支持全文索引

HBase支持全文索引

功能简介

通过org.apache.luna.client.LunaAdmin对象的createTable方法来创建表和索引,并指定表名、列族名、索引创建请求,mapping文件所在目录路径。也可通过addCollection往已有表中添加索引。查询时通过org.apache.luna.client.LunaAdmin对象的getTable方法来获取Table对象进行scan操作。

说明:

表的列名以及列族名不能包含特殊字符,可以由字母、数字以及下划线组成。

带有全文索引的HBase表限制:

1、不支持多实例;

2、不支持容灾备份恢复;

3、不支持删除行/列族操作;

4、Solr侧查询不支持强一致性;

代码样例片段

以下代码片段在com.huawei.bigdata.hbase.examples包的“LunaSample”类的testFullTextScan方法中。

  public static void testFullTextScan() throws Exception {
    /**
     * Create create request of Solr. Specify collection name, confset name,
     * number of shards, and number of replication factor.
     */
    Create create = new Create();
    create.setCollectionName(COLLECTION_NAME);
    create.setConfigName(CONFSET_NAME);
    create.setNumShards(NUM_OF_SHARDS);
    create.setReplicationFactor(NUM_OF_REPLICATIONFACTOR);
    /**
     * Create mapping. Specify index fields(mandatory) and non-index
     * fields(optional).
     */
    List<ColumnField> indexedFields = new ArrayList<ColumnField>();
    indexedFields.add(new ColumnField("name", "f:n"));
    indexedFields.add(new ColumnField("cat", "f:t"));
    indexedFields.add(new ColumnField("features", "f:d"));
    Mapping mapping = new Mapping(indexedFields);
    /**
     * Create table descriptor of HBase.
     */
    HTableDescriptor desc = new HTableDescriptor(HBASE_TABLE);
    desc.addFamily(new HColumnDescriptor(TABLE_FAMILY));
    /**
     * Create table and collection at the same time.
     */
    LunaAdmin admin = null;
    try {
      admin = new AdminSingleton().getAdmin();
      admin.deleteTable(HBASE_TABLE);
      if (!admin.tableExists(HBASE_TABLE)) {
        admin.createTable(desc, Bytes.toByteArrays(new String[] { "0", "1", "2", "3", "4" }),
            create, mapping);
      }
      /**
       * Put data.
       */
      Table table = admin.getTable(HBASE_TABLE);
      int i = 0;
      while (i < 5) {
        byte[] row = Bytes.toBytes(i + "+sohrowkey");
        Put put = new Put(row);
        put.addColumn(TABLE_FAMILY, Bytes.toBytes("n"), Bytes.toBytes("ZhangSan" + i));
        put.addColumn(TABLE_FAMILY, Bytes.toBytes("t"), Bytes.toBytes("CO" + i));
        put.addColumn(TABLE_FAMILY, Bytes.toBytes("d"), Bytes.toBytes("Male, Leader of M.O" + i));
        table.put(put);
        i++;
      }

      /**
       * Scan table.
       */
      Scan scan = new Scan();
      SolrQuery query = new SolrQuery();
      query.setQuery("name:ZhangSan1 AND cat:CO1");
      Filter filter = new FullTextFilter(query, COLLECTION_NAME);
      scan.setFilter(filter);
      ResultScanner scanner = table.getScanner(scan);
      LOG.info("-----------------records----------------");
      for (Result r = scanner.next(); r != null; r = scanner.next()) {
        for (Cell cell : r.rawCells()) {
          LOG.info(Bytes.toString(CellUtil.cloneRow(cell)) + ":"
              + Bytes.toString(CellUtil.cloneFamily(cell)) + ","
              + Bytes.toString(CellUtil.cloneQualifier(cell)) + ","
              + Bytes.toString(CellUtil.cloneValue(cell)));
        }
      }
      LOG.info("-------------------end------------------");
      /**
       * Delete collection.
       */
      admin.deleteCollection(HBASE_TABLE, COLLECTION_NAME);

      /**
       * Delete table.
       */
      admin.deleteTable(HBASE_TABLE);
    } catch (IOException e) {
      e.printStackTrace();
    } finally {
      /**
       * When everything done, close LunaAdmin.
       */
      admin.close();
    }
  }

解释

(1)创建索引请求

(2)创建表描述符

(3)获取LunaAdmin对象,LunaAdmin提供了建表和索引、添加索引、检查表是否存在、检查索引是否存在、删除索引和删除表等功能。

(4)调用LunaAdmin的建表方法。

(5)往表中插入数据。

(6)构造全文索引条件,设置FullTextFilter,进行查询。

(7)删除索引。

(8)删除表。

(9)关闭admin资源。

注意事项

  • 创建表和索引都必须不存在。
  • 必须使用LunaAdmin获取Table对象进行scan操作。
作者 east
bug清单 2月 28,2021

ZooKeeper客户端无法使用

ZooKeeper客户端无法使用

现象描述

当往ZooKeeper节点写入超过4MB数据的文件时,ZooKeeper客户端无法使用,出现如下信息。

2014-11-07 15:23:34,237 | WARN | NIOServerCxn.Factory:/10.18.51.157:24002 | 
Exception causing close of session 0xe4985ef3128000d due to java.io.IOException: Len error 1080037 | 
org.apache.zookeeper.server.NIOServerCnxn.doIO(NIOServerCnxn.java:362)
2014-11-07 15:23:34,238 | INFO | NIOServerCxn.Factory:/10.18.51.157:24002 | 
Closed socket connection for client /10.18.51.156:44987 which had sessionid 0xe4985ef3128000d | 
org.apache.zookeeper.server.NIOServerCnxn.closeSock(NIOServerCnxn.java:1007)

可能原因

ZooKeeper的数据大小是由“jute.maxbuffer”参数的值决定的。如果数据超过配置的值,服务端会拒绝访问并出现以上异常。该参数的默认值为4MB,且该参数不能修改。在集群的服务端和客户端必须保持这两个参数的一致性。

定位思路

无。

处理步骤

建议用户不要去修改“jute.maxbuffer”参数的值,在ZooKeeper节点写入数据时,确保单个文件的大小不超过4MB。为确保ZooKeeper的性能,建议不要将大量的数据写入到ZooKeeper节点中。

作者 east

上一 1 … 60 61 62 … 92 下一个

关注公众号“大模型全栈程序员”回复“小程序”获取1000个小程序打包源码。回复”chatgpt”获取免注册可用chatgpt。回复“大数据”获取多本大数据电子书

标签

AIGC AI创作 bert chatgpt github GPT-3 gpt3 GTP-3 hive mysql O2O tensorflow UI控件 不含后台 交流 共享经济 出行 图像 地图定位 外卖 多媒体 娱乐 小程序 布局 带后台完整项目 开源项目 搜索 支付 效率 教育 日历 机器学习 深度学习 物流 用户系统 电商 画图 画布(canvas) 社交 签到 联网 读书 资讯 阅读 预订

官方QQ群

小程序开发群:74052405

大数据开发群: 952493060

近期文章

  • AUTOSAR如何在多个供应商交付的配置中避免ARXML不兼容?
  • C++thread pool(线程池)设计应关注哪些扩展性问题?
  • 各类MCAL(Microcontroller Abstraction Layer)如何与AUTOSAR工具链解耦?
  • 如何设计AUTOSAR中的“域控制器”以支持未来扩展?
  • C++ 中避免悬挂引用的企业策略有哪些?
  • 嵌入式电机:如何在低速和高负载状态下保持FOC(Field-Oriented Control)算法的电流控制稳定?
  • C++如何在插件式架构中使用反射实现模块隔离?
  • C++如何追踪内存泄漏(valgrind/ASan等)并定位到业务代码?
  • C++大型系统中如何组织头文件和依赖树?
  • 如何进行AUTOSAR模块的持续集成(CI)部署与版本控制?

文章归档

  • 2025年5月
  • 2025年4月
  • 2025年3月
  • 2025年2月
  • 2025年1月
  • 2024年12月
  • 2024年11月
  • 2024年10月
  • 2024年9月
  • 2024年8月
  • 2024年7月
  • 2024年6月
  • 2024年5月
  • 2024年4月
  • 2024年3月
  • 2023年11月
  • 2023年10月
  • 2023年9月
  • 2023年8月
  • 2023年7月
  • 2023年6月
  • 2023年5月
  • 2023年4月
  • 2023年3月
  • 2023年1月
  • 2022年11月
  • 2022年10月
  • 2022年9月
  • 2022年8月
  • 2022年7月
  • 2022年6月
  • 2022年5月
  • 2022年4月
  • 2022年3月
  • 2022年2月
  • 2022年1月
  • 2021年12月
  • 2021年11月
  • 2021年9月
  • 2021年8月
  • 2021年7月
  • 2021年6月
  • 2021年5月
  • 2021年4月
  • 2021年3月
  • 2021年2月
  • 2021年1月
  • 2020年12月
  • 2020年11月
  • 2020年10月
  • 2020年9月
  • 2020年8月
  • 2020年7月
  • 2020年6月
  • 2020年5月
  • 2020年4月
  • 2020年3月
  • 2020年2月
  • 2020年1月
  • 2019年7月
  • 2019年6月
  • 2019年5月
  • 2019年4月
  • 2019年3月
  • 2019年2月
  • 2019年1月
  • 2018年12月
  • 2018年7月
  • 2018年6月

分类目录

  • Android (73)
  • bug清单 (79)
  • C++ (34)
  • Fuchsia (15)
  • php (4)
  • python (42)
  • sklearn (1)
  • 云计算 (20)
  • 人工智能 (61)
    • chatgpt (21)
      • 提示词 (6)
    • Keras (1)
    • Tensorflow (3)
    • 大模型 (1)
    • 智能体 (4)
    • 深度学习 (14)
  • 储能 (44)
  • 前端 (4)
  • 大数据开发 (484)
    • CDH (6)
    • datax (4)
    • doris (28)
    • Elasticsearch (15)
    • Flink (78)
    • flume (7)
    • Hadoop (19)
    • Hbase (23)
    • Hive (40)
    • Impala (2)
    • Java (71)
    • Kafka (10)
    • neo4j (5)
    • shardingsphere (6)
    • solr (5)
    • Spark (99)
    • spring (11)
    • 数据仓库 (9)
    • 数据挖掘 (7)
    • 海豚调度器 (9)
    • 运维 (33)
      • Docker (2)
  • 小游戏代码 (1)
  • 小程序代码 (139)
    • O2O (16)
    • UI控件 (5)
    • 互联网类 (23)
    • 企业类 (6)
    • 地图定位 (9)
    • 多媒体 (6)
    • 工具类 (25)
    • 电商类 (22)
    • 社交 (7)
    • 行业软件 (7)
    • 资讯读书 (11)
  • 嵌入式 (70)
    • autosar (63)
    • RTOS (1)
    • 总线 (1)
  • 开发博客 (16)
    • Harmony (9)
  • 技术架构 (6)
  • 数据库 (32)
    • mongodb (1)
    • mysql (13)
    • pgsql (2)
    • redis (1)
    • tdengine (4)
  • 未分类 (6)
  • 程序员网赚 (20)
    • 广告联盟 (3)
    • 私域流量 (5)
    • 自媒体 (5)
  • 量化投资 (4)
  • 面试 (14)

功能

  • 登录
  • 文章RSS
  • 评论RSS
  • WordPress.org

All Rights Reserved by Gitweixin.本站收集网友上传代码, 如有侵犯版权,请发邮件联系yiyuyos@gmail.com删除.